Sun Seems Determined to Shine

P6956-8DbDkPre2BrtPub

Most of the important things in the world have been accomplished by people who have kept on trying when there seemed to be no hope at all. – Dale Carnegie

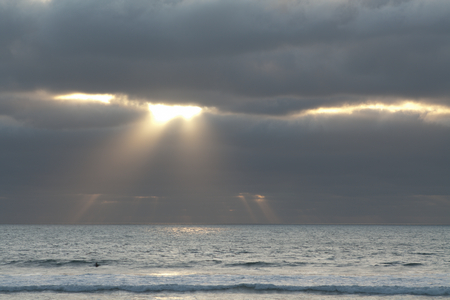
The image above was taken one year ago near San Diego, California. It causes me to think of persistence, hope and determination; of hanging on and striving to achieve a goal in spite of forces that would block one’s advancement.

The remainder of this post discusses photo processing. Primarily I wish to demonstrate, to photographers who do not yet process their images, that such processing can produce dramatic improvements. In fact, for RAW format digital images, processing is a requirement to achieve a quality final image. I am specifically addressing RAW format images here. Jpg images, which are processed within the camera, usually look much better than RAW images when initially downloaded. However, jpgs record much less image information than RAW files. Because of this, jpg file/format images have little tolerance for post-processing, if a person wants to make changes later. You can think of RAW file images as the negatives used in film photography and manipulated in the darkroom. They allow many different interpretations and adaptations, depending on the mood/goal of the photographer. This is why almost all professional photographers shoot using the RAW file format.

6956original1

This is the original, unprocessed middle image of  the set of three images used to make this panorama. I include it to demonstrate how much difference was made by the processing.

Using Color Efex Pro 4, the “dark contrast” filter was applied twice globally. Then the “brilliance and warmth” filter was applied centrally to the sun rays and a mild vignette effect was added only at the sides. (All of these changes can be done with Photoshop Elements alone. Color Efex Pro 4 just makes it much quicker and more convenient.) The most difficult and time consuming part of the processing was getting the waves aligned in the three different parts of the panorama  (In the time that it takes to swivel the tripod head for the next frame of the panorama, the waves move closer to the beach). Using Photoshop Elements, the waves were properly aligned with a combination of copying and pasting and by cloning waves in the following modes: hue, lighten, darken, and normal. (The clone stamp tool has options for many different modes besides “normal”; such as hue, saturation, color burn and doge, overlay, soft light, lighten, and darken, multiple and others.) Nik Sharper Pro 3 for display output was used except for the water which became distracting.

Now the image (shown at the top of this post) looks like a remember it. There is so much improvement between the original, unprocessed RAW images and the final image (at the beginning of this post), that it is fair to say that the processing rescued it from being deleted from the catalog.

I welcome comments and criticisms.

I am available to help people to transform their nature images from boring to impressive. My personal web site is NaturePhotoRehab.com, although it is easiest to reach me via this blog.

J. Michael Harroun©2013

HDR and Panorama Combination with Moving Waves

hd4488Fs2-9-Ed3Dn1TxSp

Today is a new day. You will get out of it just what you put into it. If you have made mistakes, there is always another chance for you. And supposing you have tried and failed again and again, you may have a fresh start any moment you choose, for this thing we call ‘failure’ is not the falling down, but the staying down. -Mary Pickford

Today’s recommended site is of time lapse flower photography set to music. http://player.vimeo.com/video/27920977?title=0&%3bbyline=0&%3bportrait=0href=

For a long time I have wondered whether it was practical to do an HDR (high dynamic range) composite of an ocean/beach panorama which has (moving) waves. The primary challenge would be whether the software could deal effectively with the movement of the waves as they would not align automatically from one frame to the next (producing “ghosting”). This week I actually got around to trying it. I used images of the above sunset with a couple sitting on the beach. Exposing properly for the sky caused the sand and couple in chairs to be way underexposed. Alternatively, exposing for the couple overexposed the sky. This is a perfect situation for HDR; subtle HDR, not the exaggerated, cartoonish variety. I used Photomatix Pro 4.2.6 for the HDR processing. This is the version referred to when “Photomatix” is mentioned below.

Capture technique:

  • Shot in manual mode, auto bracketing 3 exposures each with a one stop increment and using continuous shooting drive mode. (Typically two stop increments are used, but the lighting here was not extreme.)
  • I shot just as I do any panorama (tripod and shutter release cable) except each frame of the panorama got the rapid auto bracketing.

Processing workflow:

  • Files were first processed in Adobe Camera Raw to uniformly remove noise (both luminance and color), add “clarity” and slightly (preprocessing) sharpen. Because Photomatix Pro 4.2.6 does not recognize edits made to raw files, these changes were saved in tiff file format. This conversion to tiff format is necessary because Photomatix Pro 4 does not recognize any edits/enhancements that are kept in the raw format. (A better method is to utilize Photomatix Pro 4’s ability to accept unedited raw format images as noted below under “What I will do differently next time”.)
  • In Photoshop Elements, a separate panorama was created for each of the three exposures (still in tiff file format).
  • In Photomatix, “Exposure Fusion/Natural” mode was used for the HDR processing (This results in a more natural/realistic image than given by the “tone mapping Details Enhancer” mode.) As expected, the waves went soft due to “ghosting” caused by the wave movement. But I found these results to be acceptable in this case, since the waves are incidental to the image. (If sharp waves are needed, Photomatix allows the waves from any single image to replace the HDR processed waves in order to prevent ghosting).
  • In Photoshop Elements, contrast was increased with “Color Curves”. This effect was masked out from the sand, particularly the bright middle portion of the beach as it became distracting. (Alternatively, I could have used Photomatix “finishing touches” function to increase the contrast and color.)
  • The expected wave misalignment between the side-by-side panorama frames (as previously stitched by Photoshop Elements) was easily remedied by horizontal strokes of the (Photoshop Elements) smudge tool.
  • Using Nik Sharpener Pro 4.2.6, moderate sharpening was done for “display” output (this sharpening was masked out over the sand as it looked rough and distracting).

What I will do differently next time:

  • Skip the initial processing with Adobe Raw Converter and put the raw files directly into Photomatix.
  • Since I used Photomatix “exposure fusion/natural mode, no initial noise removal was needed. This mode inherently reduces noise.
  • (However, when planning to use Photomatix “tone mapping detail enhancer” mode for HDR processing, initial noise reduction is necessary as this mode otherwise creates noise.) Conveniently, Photomatix has an automated noise detection/removal function that does a better job than my eye ball method with Adobe raw converter. To utilize this automated noise reduction, raw files are entered directly into Photomatix without any prior raw converter or Photoshop edits. This is a better workflow because it prevents the need to change the files to tiff format prior to using Photomatix. (When using this method, each side-to-side panorama frame is processed into an HDR tiff image. Then these are stitched into a panorama in Photoshop Elements.
  • I’ll use Photomatix’ selection replacement tool to replace the bright middle portion of the beach with the darker portion of the beach that was in my “middle exposure” image.

Suggestions for sharp waves:

  • Shoot with a tripod and either shutter release cable or remote shutter release
  • Use a shutter speed 1/15 sec or faster (the faster the better). If necessary to achieve adequet shutter speed, increase ISO 1-2 notches above the lowest that your camera offers (particularly if you have processing software with noise removal capability).
  • Use auto exposure bracketing with continuous shooting drive mode
  • In your HDR processing program use the de-ghosting tool to replace the entire water/wave area with that same section of one of the original images. (The waves will not show the effects of HDR processing, but will be sharper than if HDR processed.)

I welcome comments and suggestions.

My personal website is NaturePhotoRehab.com. Here, I help people to transform their average nature images into photographic art that they are proud to give as gifts or to hang on their own wall for inspiration.

J. Michael Harroun©2013

Easy Panoramas with Photoshop Elements

6169-3DSzEf3-3TxSp

The “ordinary” is the amazing, the fascinating and the liberating with which we have become so familiar as to have ceased to see it for what it actually is.

Today’s recommended site for exceptional photography: Randy Halverson’s astounding time lapse photography in video with music: Temporal Distortion http://dakotalapse.com/2012/02/temporal-distortion-2/

The photo above is of a winter storm coming onshore near San Diego, California. I expected the clouds to obscure the sunset. However, changing weather has a potential to produce dramatic sunsets. I was rewarded with this one.

This scene, with its complex light and color changes, was perfect for a panorama composite. Panoramas are not difficult with today’s (or even five year old) software. This tutorial is for photographers just beginning with panorama composites. I am using Photoshop Elements. This information applies to any version of Photoshop Elements from 7 up to the current version ,which is 11. (For those who have a limited budget, but want versatile processing software, I recommend Photoshop Elements versions 8 or 9. (Ebay and nextag often have low prices.)

Technique to create a panorama

  • Use a tripod.
  • Shutter remote control or release cable.
  • Use the same settings and focus for each frame by shooting in manual mode and with manual focus.
  • It’s important that your manual settings be based on the brightest portion of your panorama and usually with a +1/3 to + 2/3 exposure compensation. (If you are not familiar with “Manual” shooting mode, here is a good work around. In Aperture Priority shooting mode with auto focus active, set aperture to f/16 and ISO to the lowest number that your camera offers. Shoot an image of what will be the brightest portion of your panorama. In playback mode, if you like the exposure and focus, note the  shutter speed that your camera chose. Now, without touching the focusing ring of the lens, change to “manual” shooting mode . Enter the shutter speed that your camera just used. Also enter f/16 and the ISO you used for the Aperture Priority shot. Change to manual focus, again without touching the focusing ring of the lens. The previous auto focus setting will still be active. This just locks it in.)
  • Position the camera level (easiest if you have a level that attaches to the flash attachment hot shoe).
  • Adjust tripod/tripod head so that side to side rotation during the panorama series will be level.
  • Shoot from side to side in sequence with 1/3 overlap between frames.
  • I recommend beginning with 3 frames and building to more when successful with this.
  • Practice this with scenes that are not important. During a sunset the light changes rapidly. It is easy to forget a crucial aspect of the technique.

Photoshop Elements panorama processing (many other software programs also give great results)

  • Open all the images that you wish to combine in “full edit mode”.
  • Click on “File” (at the top left of the window). Then (in the drop down menu) click “New” ;then “Photomerge Panrama”.
  • In the Photomerge dialog window leave “Layout” on “Auto” (the default).
  • At the bottom of the dialog box, choose “Blend Images Together” (if not already done by default) and check “Geometric Distortion Correction”.
  • Click “Add Open Files”, then “Ok”.(If you have some open files that are not panorama parts, remove them from this list)
  • Photomerge will then work its magic. (This may take a few minutes)
  • The panorama created will have uneven edges. Crop to make it rectangular.
  • If the panorama composite looks weird, go through the same actions as above, except when you get to the Photomerge dialog page, under “Layout”, click on“Perspective”.
  • The panorama image is now on separate layers (which will make a huge file size). To fix this, go to “Layers” at the very top of the editor window. In the drop down menu click “Flatten Image” (at the very bottom of the drop down list).
  • Click “File” (at the extreme top left of the window)  and “Save As”.

That’s all there is to it.I hope this post leads someone into the fascinating world of panorama composites which has provided me with lots of fun and satisfaction.

I welcome comments and suggestions.

My website for image enhancements is NaturePhotoRehab.com where I help people to transform their ordinary nature images into impressive art to give as a gift or to hang on their own wall for inspiration.

J. Michael Harroun©2013

Christmas Sunset Surprise

P6098-2prsEf1TxSp

Grace means more than gifts. In grace something is transcended, once and for all overcome. Grace happens in spite of something; it happens in spite of separateness and alienation. Grace means that life is once again united with life, self is reconciled with self. Grace means accepting the abandoned one. Grace transforms fate into a meaningful vocation. It transforms guilt to trust and courage. The word grace has something triumphant in it.  – Yrjo Kallinen

(This is my first post using my new writing style. I call it “grammar and punctuation don’t matter”. It is part of my plan to post more frequently by spending less time on each individual post. As I write this, it does not sound like a good idea to sacrifice quality for volume. However, not to be inconvenienced by logic, I am going to try it.)

On Christmas day, the sky was heavily overcast. There had been rain the night before.  I expected that there would be no visible sunset. However I also knew that some of the most spectacular sunsets occur as the sky is clearing after bad weather. An hour before sunset, the sky was clearing a little on the other side of the mountain range, about 10 miles away toward the west. Not expecting to find anything worth photographing, I went to a spot with a panoramic view of the sky and mountain range. The sun then set uneventfully (no color), hidden behind clouds.  However, five minutes after the actual setting of the sun, the overcast condition quickly broke up, and the sky became bright gold in front of me plus overhead, to the sides and behind me. Then the sky turned pink briefly and faded away. Wow! I could not capture the entire amount of sky involved. To include as much sky as possible, I took several series of images for panoramic composites.

My willingness to take the camera to what I expected to be a “no show” sunset, led to experiencing one of the top ten sunsets of my life. This caused me to think about other aspects of successful sunset photography.

  • Go often: The majority of sunsets will not be impressive.  However, if you are not there, you cannot get images of the great sunsets when they do occur. (I am still unable to predict whether a sunset will be exceptional).
  • Arrive early: Sun rays coming through clouds (traditionally called “God rays” by photographers) can be most prominent up to an hour before the sun actually sets. Plus, arriving early will allow you to scout out good locations and foreground subjects.
  • Stay late: The best color (pink and red) often occur 20 to 25 minutes after the sun sets.
  • Bring a tripod: Exposures of the last pink or red can be several seconds in duration.
  • The most dramatic sunsets occur when the weather is changing, particularly when bad weather is moving out.
  • Unless a sunset is spectacular, include a foreground object. The easiest way to do this is with the foreground object is as a silhouette. If a silhouette is not used, correct exposure for both this object and the sky simultaneously requires either a neutral density filter or bracketed exposures used for high dynamic range (HDR) processing. (HDR processing is the technique that I personally like. It is surprisingly easy. First bracket your exposure for 3 frames in increments of 1 to 2 stops. Then process them with software such as Photomatix from http://www.hdrsoft.com which offers a free trial of their software. This is a good starting point for shooting HDR, although this technique, to be mastered, is very complex.)

Image processing:

  • I processed the original RAW  format images in Photoshop Elements raw converter.
  • Brightness, vibrance and clarity were added.
  • Noise, both luminance and color, were reduced.
  • A tiny bit of sharpening was added.

Here is the result on a single frame.

6100Downsz1

Although improved via raw converter processing, the images (like the single frame above), the color is a little dull and the lighting a little flat. Therefore, after generating a panorama using Photoshop Elements panorama tool, I used Nik ColorEfx Pro4 (once again, to the rescue). I used a little Pro Constrast and a little Color Range Contrast with good results.

Finally, I sharpened via Nik Sharpener Pro 3.0 (which I love). The final composite is the image at the top of this post. It is made from 7 images taken from side to side with the camera in a vertical orientation and a one third overlap between frames.

I welcome comments, criticism and suggestions for future blog topics.


I am available at my photo enhancement website (NaturePhotoRehab.com) to assist clients with transforming their common nature photos into uncommon works of art that they are proud to give as gifts or to hang on their own wall for inspiration.

J. Michael Harroun ©2013  NaturePhotoRehab.com

Flower Fireworks – Happy New Year!

2735-76_1Efflat5TxSp

Most people can look back over the years and identify a time and place at which their lives changed significantly. Whether by accident or design, these are the moments when, because of a readiness within us and collaboration with events occurring around us, we are forced to seriously reappraise ourselves and the conditions under which we live and to make certain choices that will affect the rest of our lives.   – Frederick F. Flack

Thank you all who have visited my blog this past year. Especially, I wish to thank those people who are following this blog and who have provided comments on my posts. I wish for you all, health and happiness. Happy New Year! I have found inspiration in the posts of many of you. 

I cannot remember the last year that I made resolutions. This year, for whatever reason, I have decided that resolutions are appropriate.

Here are my (daily) resolutions:

Learn five things that are totally new to me:

  • a fact or piece of information (ie the pygmy right whale belongs to a species that was thought to have been extinct for millions of years. Not very practical info, but I enjoy being amazed. Science has not even figured out all the data about the animals that are here.)
  • a picture of something that I have never before seen, or at least that I have never seen depicted in that style (Yesterday’s find was Guy Tal’s marvelous landscapes that he has processed as paintings (http://guytal.com/gtp/gallery/index.jsp).
  • listen to a song that I have not heard before (thank you Pandora)
  • do something that extends an ability that I already have (like learning a new technique of photo processing)
  • do something in a way that is not my usual way (such as… I don’t know. This category is going to take some effort)

Give an unexpected gift to someone

Show, through my actions, that I love someone.

Become conscious of at least 20 things for which I am thankful.

Recommit, through actions, to my values and priorities.

Post more often on my blog, not worrying about proper grammar or punctuation.

The photo at the top of this page is a large chrysanthemum, each bloom of which is at least 4-6 inches in diameter. Usually close up photographs have a shallow depth of focus, that is, only a portion of the subject is in focus. This photo is almost entirely in sharp focus, because of using a technique called focus stacking. Multiple images are captured that are exactly the same except for the area in sharp focus. In this case, 41 separate photos were taken, beginning at the closest point of the flowers to the lens and working toward the back of the flowers with the focal plane of each photo being 2 mm deeper than the last. Then all the images were processed with Helicon Focus software (from http://www.heliconsoft.com/heliconfocus.html), which does an unbelievable job. (I highly recommend it both for close up/macro work, and for landscapes.) If you are interested in more information on focus stacking, please check out my first two posts of this blog.

Again, I wish you all a Happy New Year!

I welcome comments and criticisms (mostly comments).

My website for photo enhancing, processing and saving seemingly useless images is NaturePhotoRehab.com

J. Michael Harroun©2013

Digital Photography: the ISO setting

“The truth is that our finest moments are most likely to occur when we are feeling deeply uncomfortable, unhappy, or unfulfilled. For it is only in such moments, propelled by our discomfort, that we are likely to step out of our ruts and start searching for different ways or truer answers.”  -M. Scott Peck


The level of difficulty for this discussion of ISO settings: beginners

Understanding ISO is surprisingly easy.

  • Sensor sensitivity to light: ISO is a carryover from the days of film photography. It referred to the amount of sensitivity to light of a particular type of film. Similarly in digital photography, ISO indicates the degree of sensitivity to light of the camera’s light sensor. This sensitivity is adjustable. The higher the ISO, the more sensitive is the sensor to light. This greater sensitivity of the sensor allows the use of a faster the shutter speed and/or smaller aperture diameter than would be needed if the ISO (and sensitivity to light) were lower. A faster shutter speed is usually an advantage because it increases the probability that the image will be sharp.
  • Electronic noise: The disadvantage of high ISO however, is that more sensitive pixels are more likely to be activated by electron movement within the sensor itself, rather than by the light. This accidental firing of pixels produces red and green pixel-sized dots (color noise) and mottling in areas of uniform lighting such as blue sky (luminance noise). In addition to ISO, the amount of noise within an image depends upon the sensor type and quality.Color noise (also called chrominance noise and chromatic aberration) shows up most readily in the darker areas of your photo when viewed at a magnification of 150% or higher (200% makes this easier for me). Luminance noise (also called contrast noise) areas of uniform color and lighting, such as blue sky, when viewed at a magnification of 150% or higher (again, 200% is easiest for me).
  • Which ISO is best? To minimize the amount of electronic noise in your images, use the lowest ISO setting that allows you a shutter speed fast enough to achieve the effect that you want for that image. Usually, the preferable effect is sharpness. For instance, to “freeze” the motion of a person walking, a shutter speed of at least 1/125 sec is needed. To stop the motion of a person running, a minimum shutter speed of 1/250 sec is needed. In order to have sharp images of sporting activities often requires a shutter speed of at least 1/500 sec. If the light on the scene is low, shutter speeds this fast will not be possible with a low ISO setting, even when using a large diameter aperture.  When in this situation, increase the ISO only as much as is needed to achieve your desired shutter speed.   This increased noise level just needs to be tolerated or, better yet, removed with editing software. A high ISO is also necessary in very low light situations such as night photography, especially night sky photography of the stars.
  • When slow shutter speed is needed, a low ISO is helpful: Sometimes a blur is the photographer’s desired effect. The most common example is flowing water or waves that one wants to appear smooth or hazy. In this case a long shutter speed is needed, typically 2 to 15 seconds. Using the lowest ISO setting (and a small diameter aperture like f/16 or f/22) will help to get shutter speeds that last this long without overexposing your image. Another example of a specific need for a low ISO setting is when the desired effect is a blurring of a person walking or of moving automobiles, in order to convey the feeling of speed.
  • For those people who do not want to mess with ISO settings, use your camera’s program option for landscape, portrait, close up, action/sports and night photography. Your camera will then automatically provide you with the ISO setting which is usually the best.

Condensed version for those in a hurry:

  • The higher the ISO number, the more sensitive the camera’s sensor is to light.
  • The higher the sensor’s sensitivity to light, the more electronic “noise” the image contains.
  • To minimize the amount of noise, use the lowest ISO number that allows a fast enough shutter speed to achieve the effect that you want (usually sharpness).
  • Cameras with program options such as landscape, portrait, close up, action/sports and night photography, will automatically provide you with the ISO setting which is usually the best for that purpose.
  • Electronic noise can be removed with editing software. However bold noise removal creates loss of sharpness or decreased saturation of color.

When noise in an image usually does not matter: When your photo is going to be displayed on the web or you will make prints no larger than 4 inches by 6 inches, noise will usually not be apparent unless the noise level is very high. (But you never know when you will shoot a remarkable image that you wish to enlarge and print. A high noise level will require special processing for removal).

Noise removal

  • Every digital image contains noise regardless of the ISO or quality of the camera.
  • Noise removal is the first step of image processing by professionals.
  • High ISO creates much more noise than usual, making its reduction even more important. Noise removal is accomplished with editing software (luminance noise reduction and color noise reduction) such as the software that came with your camera, Photoshop, Photoshop Elements, Lightroom and many other editing programs. (The best, and easiest to use noise reduction software that I know of is Nik software’s Dfine program). However large amounts of noise reduction produce slightly blurred images from luminance noise reduction and/or unsaturated (faded) color from color noise reduction. A slightly blurry image can sometimes be saved by applying extra sharpening with your editing software. Desaturated color can be easily fixed by adding a little saturation with editing software.

I welcome comments, criticisms and questions about specific photography issues that you may be experiencing.

I am available at NaturePhotoRehab.com where I help people have their images transformed into impressive works of art that they are proud to either hang on their own wall or give as a gift.

J. Michael Harroun©2012 NaturePhotoRehab.com

Digital Photography: Processing Is Not Cheating

“The important thing is this: to be ready at any moment to sacrifice what you are for what you could become.”   – Charles Dickens

Level of difficulty: beginners

Is image processing cheating? No.

  • Digital images are the result of processing the data generated from millions of red, blue and green pixels in the light sensor. Processing is actually a necessity in order for a digital photo to look realistic. Of course, processing can also be use to create an emotional response in the viewer such as ephemeral, moody, dramatic or old fashioned.
  • Over-processing produces a garish and unnatural appearance causing the viewer to ask “Is that what it really looked like?
  • Correct processing causes the viewer to say “Wow”.
  • Over 99% of all professional’s digital images are processed.

What is image processing?

  • the adjustment/manipulation of the data generated by the digital sensor when it is exposed to light. Some frequently adjusted properites of an image are contrast, color hue, saturation, brightness of highlights, darkness of shadows, white balance, sharpness, etc).
  • Processing is done in-camera immediately after the photo is taken to create jpg images.
  • If you do not direct the adjustments, you will have to accept a lot of guess work by your camera and its image editing software.

There are three main categories of image processing: in camera, raw converter and “post processing”. I will primarily address in-camera and raw converter processing today. Post-processing with full editing software, such as Photoshop will be covered in a future post.

In camera processing:  Within all digital cameras, there is a tiny computer processor. Unless a camera is set to record a “camera raw” file format, this processor modifies/adjusts the data generated by the digital sensor immediately after a photo is taken. If you are recording images in the jpg file format (image file name ends in .jpg), then you are using processed images. Your images are being processed within your camera. This processing is required to create a jpg file format image. If you do not adjust the camera’s default settings for creating a jpg image, then your camera has to make a lot of guesses about the lighting conditions present and about how you want your image to look. If you like the appearance of all your jpg photos already, then there is no reason to make any change. However, if some of your images look dull, flat or washed-out, then you will benefit from learning how to control at least some of your camera’s processing. It’s not as difficult as it sounds.  In fact the first stage is very easy.

How do I begin processing without being overwhelmed? Do just a little at a time. If possible, take at least 20 minutes every day or two to learn something new about the editing programs that you have (an editing program comes with every digital camera). Then take at least 10 minutes to experiment with one of your images with the information that you learned.

How to begin controlling the in-camera processing?

1) For in-camera processing of jpg images, begin using you camera’s program modes for landscape, portrait, night scenes, etc (Different manufacturers give these different names, but common names are picture styles or creative program modes). They are usually accessed either via a button on the back of the camera or with a wheel that has tiny pictures on it). These will allow you to use presets that your camera came with, so that you do not need to make all the changes by yourself initially.

  • “Standard” (auto) programs are for general use. They usually increase contrast mildly and color vividness (saturation) and sharpness moderately.
  • The landscape setting (usually with a picture of a mountain) will make blues (sky) and greens (grass and tree leaves) more vivid (more saturated), strongly increase sharpness for greater detail and use a small aperture width for maximal depth of focus.
  • Portrait mode will adjust color for better skin tones, add  little or no sharpness (for smooth skin) and use a medium width aperture so that the background is blurred (helping to keep one’s attention on the person).
  • Close up mode (usually with a picture of a flower) increases color saturation, increases sharpness and uses a wide aperture for fast shutter speed and blurring of foreground and background.
  • Other specific program modes or picture styles, such as night scenes or action/sports, make their own distinctive adjustments. Letting your camera know what type of picture you are taking, will help it to produce a more pleasing image.

2)  The reason to take greater control over the in-camera processing is to decrease the amount of guess work that your camera has to do about the style, composition and lighting of the image that you took. Also your camera will not have to guess about your personal preferences for your images (For instance, I like more contrast, saturation and sharpness than average). The goal is to create more realistic or evocative images, although it will allow you to have unusual or weird effects if you choose. Generally we want images that appear realistic to the viewer.

  • White balance: First, I recommend that you learn to set the white balance. I covered this in detail in my last post entitled “Photography: White Balance Essentials”. If you are not familiar with white balance, please check it out.
  • Contrast, saturation and sharpness: Find your camera’s settings for these image characteristics.  Usually they will be in the recording menu or the menu for “functions” or custom picture styles. (Often there is a button on the back of the camera that gets you quickly to these settings.  (Check your camera’s instruction manual).There, you can individually adjust contrast, color saturation, sharpness, color tone and perhaps some additional properties (depending upon your particular camera).  Begin by adjusting just one of these characteristics at a time. (The changes that you will make now will not affect your camera’s settings for the preset picture styles and creative program modes (landscape, portrait, close up, etc that I mentioned with in-camera processing-part 1, above).
  • Setting contrast: Low contrast gives a smooth, delicate, dreamy or flat appearance. High contrast increases depth of field, detail and texture. It also can give a more dramatic appearance to images. Take pictures of the same thing with different settings for contrast. Start with the lowest amount of contrast offered and work up to the maximal setting. Compare the images to see which you like best.  Make a note of it. (The very highest and lowest settings are likely to make it look weird, but sometimes you may want to make your images weird). You probably will like a different amount of contrast for landscapes than for portraits, than for night scenes, etc. You can add that information later. It’s a very good idea to keep a record or journal of the settings that you like. (In the past, whenever I have not written it down immediately, I have forgotten the result and have to do it all again.)
  • Saturation (vividness of colors):  Low saturation tends to give calm, delicate of dreamy feel to the images. Moderate saturation gives vivid colors and a dramatic feeling. High saturation tends to look garish and definitely unnatural. Take a photo of something at each of the settings offered by your camera from the lowest to highest option. Again compare the pictures to see which settings you like best for this particular type of photo and write it down. You can do this with other types of photos later to see whether you like different t settings for them.
  • Sharpening: Generally, low sharpening gives a smooth look to skin in portraits, less apparent texture and depth of field and helps with a calm or delicate feel. High amounts of sharpening bring out texture and depth of field. It is often used for landscapes or images with lots of detail (like leaves of a tree). But high levels of sharpening will ruin most images, so be judicious. High levels of sharpening create lots of artifacts (tiny circles called halos at the edges of things). Halo artifacts give a very unnatural appearance and cannot be removed once a jpg image is recorded. A very common error is to apply too much sharpening.

Images recorded in a jpg file format loose data each time they are opened. However images with a tiff file format are stable and do not loose information. It’s best to convert your jpg images to tiff images as soon as they are into your computer. (If you click on the “File” menu  and click “Save as”, you can change the file format to end with the letters .tiff. )

Raw converter processing is primarily for images recorded with a “camera raw” file format (CR2 for Canon, NEF for Nikon and other manufacturers have their own initials for this type of file). “Raw files” contain only the unprocessed data collected from the sensor when it was exposed to light (It is no more complicated than that). The advantage of using raw files are that they are durable. They do not loose information with repeated opening. Any editing changes applied to a raw file can be erased or replaced at any time. The adjustments do not alter the original image file. In this way, raw files are analogous to negatives in the film days of old.

  • All cameras that offer the option of a raw file format come with the software to edit those images (technically called a raw converter). Other programs, such as Photoshop and Photoshop Elements also contain raw converters.
  • Keeping with my recommendation that processing be learned a little at a time, start with adjusting two image characteristics: white balance and sharpness.
  • White balance: Even if you set the white balance prior to taking your photo, the color may not look just right to you when it is opened in the raw converter software. (It’s easiest to fix color if something in your photo is , or at least is supposed to be,  pure white. Find the drop down menu for white balance (usually toward the top of the screen or toolbar) and click on each option successively (sunny, shade, cloudy, etc) to see which gives the correct color. If none of these options gives a good resut, look for the eyedropper (white balance) tool and click on something that is supposed to be white. You may need to click on a couple of different places on the white object to get the best result. If nothing in your image is white, most programs allow you to click on something that is supposed to be neutral gray to determine white balance (It does not have to actually be neutral gray, just something that is supoosed to look newtral gray.
  • Sharpening: All raw images, require some sharpening to look good. This type of sharpening is safe for your image. For good results, try just a small amount of sharpening. If your program offers you a sharpening scale from neg 4 to +4, try +1 or +2. Check your image on the screen at 100% magnification to see if you like the result. If using Photoshop Elements raw converter, get to sharpening by clicking on the little tab with the triangle on it (just above white balance adjustmejnt). Then try amount 25 to 40, radius 1 and detail 25 (for images with lots of detail, like landscapes, movethe  detail slider up to 50). You do not need to do all the sharpening now. More sharpening is usually added later, after further  editing with a full feature program such as Photoshop, Photoshop Elements or Lightroom.  That type of sharpening is destructive and needs to be done as the very last step of processing.
  • Gradually add additional settings after becoming comfortable with these two settings. Adding a little at a time, but frequently is the a great way to learn processing.

Post-processing with full edit software will be covered in a future post.

Comments, suggestions (and criticisms) are welcome.

I am available at NaturePhotoRehab.com where I help people transform their nature images into impressive works of art that they are proud to give as a gift or to hang on their own wall for inspiration. I offer photo retouching, complex processing and enhancements, enlargements, prints (up to 12in x 18in) and framing.

2012©J. Michael Harroun  NaturePhotoRehab.com


Photography: Auto Exposure

“It doesn’t matter how long we may have been stuck in a sense of our limitations. If we go into a darkened room and turn on the light, it doesn’t matter if the room has been dark for a day, a week, or ten thousand years — we turn on the light and it is illuminated. Once we control our capacity for love and happiness, the light has been turned on.”  – Sharon Salzberg

Recommended blog site: Accepting the risk that no one will come back to read the remainder of this post, I highly recommend basilbloginc.wordpress.com. Basil is on safari and has dramatic photos and captivating narratives (zebras, giraffes, and migrating wildebeests).

My last post concerned two exposure adjustments (increasing illumination detail in the shadows and color detail in the highlights) which require processing in editing software. This post is for the many photographers who do not process their images with a computer.

Modern auto exposure (AE) systems are amazingly accurate throughout a wide range of lighting conditions. However, there are situations that are beyond their ability. Here, I will describe how to adjust for lighting conditions with which auto exposure systems have problems.

Correct exposure is crucially important because most digital sensors are capable of capturing only 5-6 stops of illumination in any one frame. The majority of cameras have only the 5 stop range which is a difference of 32 times as much light in the shadows as in the highlights. Therefore, if the highlights are more than 32 times brighter than the darkest shadows, then either the highlights will be blown out (completely white) or the shadows will be completely black. For comparison, with both midday sunlight and dark shadows within a scene, the highlights are thousands of times brighter than the darkest shadows.

Auto exposure limitations: Most photographs are made up of predominantly middle tones with some highlights and some shadows. To accommodate this, auto exposure (AE) systems attempt to get as much of the scene as possible to be mid-tone (specifically 18% gray).  Usually this works out fine. However, predominantly bright or predominantly dark scenes are not properly exposed. If your scene is mostly bright, auto exposure will exposure your scene to be middle gray. Thus a landscape of direct sun on fresh snow will have gray snow. If the scene is overall dark, auto exposure will produce an image lightened to middle gray. A black bear in a thick forest at dusk will be gray. (These examples assume that the camera’s auto exposure is set to assess all of its different auto exposure areas within the frame, called evaluative auto exposure).

Assisting the auto exposure system: To get correct exposure of these predominantly bright or dark scenes, you can tell your camera (before taking the shot) that you want the image of the snowy scene to be brighter than usual. This is done by adjusting the exposure compensation. (Most cameras have a button on the back or top that allows easy access to the exposure compensation function, usually marked “+/-“).

To get proper exposure of a bright scene, set exposure compensation to a positive (+) number. For a somewhat bright scene, such as direct sunlight on a light color dog in front of beige fence, start with exposure compensation +1/3 to +2/3 and adjust from there if needed.  For direct sunlight on sand, start with exposure compensation set at +1, and then adjusts if needed. For direct sun on fresh snow, set exposure compensation to +1  and 1/2 to +2.

Conversely, for dark scenes, indicate to your camera that you want a darker than average image, by setting exposure compensation to a negative (-) number. For a black dog in front of a dark green fence in shadow, start with exposure compensation of -1/3 to -2/3. For the deep red of the sky 15 minutes after sunset, try exposure compensation of -1.  For a black bear in shadow in a thick forest start with exposure compensation of -1 and 1/2.

Trouble shooting auto exposure – Basics. If you are following the above procedure and still get incorrect exposure, first check the basics.

  • Is auto exposure turned on?
  • Is it set to assess the area of the frame that you are interested in? (It may not have been reset after a recent adjustment)
  • Is exposure compensation telling your camera to vary from its usual exposure calculation? (Again, it may not have been reset after you last adjusted it.
  • Is auto exposure lock enabled, blocking the camera from assessing exposure independently for each frame?
  • Is some option turned on that overrides exposure compensation, flash compensation or manual exposure settings? For example, the Canon Rebel T2i has a feature that automatically corrects brightness and contrast for jpg images (Auto Lighting Optimizer). Its default setting is “On” (“Standard”). This option may partially override your exposure compensation and manual exposure settings when they are set to produce a darker image. This could produce a brighter image than you are expecting. (It affects only jpg, not raw, images.) This is a helpful feature for people who never adjust exposure downward themselves. However, I recommend disabling this feature if you do. However, for people who adjust exposure compensation themselves, I recommend disabling this feature for standard shooting. Enable it just when appropriate.  5) Do you have viewfinder light leak? This applies only to DSLR’s.  This type of camera has a mirror which, in its normal position, prevents light that comes into the camera through the viewfinder from reaching the sensor. However, just before the shutter opens, the mirror pops up and away from the sensor. With the mirror up, any light entering your viewfinder will provide the sensor with more light than was predicted based on “through the lens” illumination. . This can be a problem whenever bright light falls upon the viewfinder, but particularly when direct sunlight is on the viewfinder.  The greatest change/error is exposure occurs when initial exposure was determined while the eye was blocking much of the light from reaching the sensor, but when the photographer moves back just prior to the shot, allowing direct sunlight to fall upon the viewfinder. Before dismissing this as arcane and insignificant, consider that Canon DSLR’s come with a viewfinder cover attached to the shoulder strap (It’s easy to overlook this small black rectangular cover).

When only the main subject needs to be properly exposed: The examples discussed above assume that you have the auto exposure system set to assess all of its possible auto exposure areas within the frame (full evaluative metering).  However, there are occasions when the lighting varies so much that not all of the frame can be properly exposed. Thus we choose our main area/subject of interest to be well exposed and let the remainder of the frame go over/under exposed (such as when you take a photo of a groom in a blue tux that is standing in front of a bright white canopy).

When only a portion of the frame can be properly exposed, there are three common options offered by most cameras: partial, center-weighted and spot metering. Partial metering determines exposure based solely only the central area of the frame. Use this when you want correct exposure for  a fairly large subject (without caring whether the background turns out very bright or  dark (For example,  you may want your light brown dog to be properly exposed, regardless of whether the background is very bright or dark) . If your subject is not in the center of the frame, point the center of the frame at your subject and press the shutter button half way down. This establishes exposure appropriate for your subject. While still holding the button half way down, recompose the image, then shoot. Many cameras have, in addition, a button that will keep the auto exposure unchanged while you recompose. This (auto exposure {AE} lock button) is usually located on the camera back (may be marked with an asterisk).  When this is pressed, the current exposure settings are locked in until the shutter button is pressed. Thus, the shutter release button does not need to continuously held half way down to keep the exposure compensation from changing settings.  This is particularly useful for tripod work. In some cameras, AE lock applies only to this one frame. In other cameras, its effect carries over to subsequent frames until it is turned off (With this “carryover type”, don’t forget to turn it off when finished).

Center weighted auto exposure metering: A second way to limit the amount of the frame that auto exposure assesses, is called center weighted metering. In this case, exposure is calculated by giving the central area of the frame priority. However, instead of ignoring the remainder of the frame as with partial metering, the remainder of the frame is changed by a smaller amount than is the center. This would be useful when you are primarily interested in properly exposing a central subject, but do not want the background to be way too bright or dark. An example would be a flower photo with a main subject and additional flowers within a bright background. You do not want the background flowers to be blown out (grossly overexposed). Center weighted exposure is a good choice here.

Spot metering: This determines exposure based exclusively on a smaller central portion of the frame than is utilized by either partial or center weighted metering. This is great for a main subject that occupies only a small portion of the frame. For example, let’s say you are at the zoo, ready to photograph a leopard that is 20 feet away from you. If you spot meter with the very center of the frame on the leopard, it will be properly exposed regardless of whether the background is bright or dark.

I hope this will be helpful to someone. I welcome comments, criticism and suggestions for future blog topics.

I am available at NaturePhotoRehab.com to assist clients in transforming their nature photos into impressive works of art that they are proud to give as gifts or to hang on their own wall for inspiration.

©2012 J. Michael Harroun  NaturePhotoRehab.com

Digital Photography: Optimum Exposure

“I’ve missed more than 9,000 shots in my career. I’ve lost almost 300 games. 26 times I’ve been trusted to take the game winning shot and missed. I’ve failed over and over and over again in my life and that is why I succeed.”  – Michael Jordan

For many years, Michael Jordan was, by far, the world’s best basketball player. He was capable of phenomenal physical maneuvers and accuracy previously thought to be impossible. That is why I find this quote so impressive, both for its humility and for its wisdom.

My last post was about thoughts and feelings. This post focuses on technique. Specifically, it explains how to get the best detail in the low light and shadow areas, and another adjustment for maximizing color detail in the highlights of your photos.

Digital sensor limitation: In a digital camera, the actual picture is taken by a sensor which is made of millions of pixels. It is these pixels that actually “see” the light. When bright light is falling on a pixel, much more information about the light is recorded than when it is being exposed to low light. As a result, hundreds of times more gradations of light are recorded from the bright areas of a digital photo than from the low light areas. As a result, shadows show relatively little detail.

Correcting for limited detail in darker areas:  There are two stages to the correction. First, slightly overexpose your initial image. Second, use your editing software to decrease the exposure an equal amount (if it appears too bright). You end up with an image correctly exposed, but with more detail in the low light areas and shadows.

A drawback to this overexposure technique is that gradations of color will be lost in the highlights, resulting in a blotchy appearance of very bright areas of color. If your primary interest is fine detail in color, please skip down to “Optimum exposure for color”.

Correction Stage 1: Controlled overexposure is the key. But how much overexposure is appropriate? (If there is too much overexposure, detail in the highlights will be lost or “blown out”). The precise amount of overexposure is determined by using the histogram (The dreaded histogram… but wait, don’t go. This is not terribly difficult).

A histogram is simply a graphic representation of the light that the sensor is “seeing”.  The histogram looks like a mountain range. The right side of the mountain range represents the brightest areas of your photo. The higher the peaks, the greater the number of pixels sensing bright light. (“The right is the bright”). Conversely, the left side represents the dark areas and shadows in the photo. The higher the peaks on this left side, the greater the numbers of pixels exposed to low light. (Since this histogram is representing light intensity, it is called a luminance histogram.)

How to display the histogram: All DSLR’s (of which I am aware) provide a histogram. Many, but not all, other types of digital cameras offer this feature (Check your camera’s operation’s manual). Most cameras display the histogram only in the playback mode. To have the histogram display, first go to the playback menu. Find histogram. Set it to on (If you have a choice between luminance and color histogram, choose luminance).  Now, playback any image so that it shows on the screen. If the histogram does not show on your screen, use the display options button (located on the camera back, usually near the screen and labeled “disp”) to cycle through the display options until the histogram shows . (If you have an option for a histogram display in your pre-shot viewfinder or “live view” screen, it can usually be turned on in the recording menu. You can make your adjustments directly without using the playback mode).

Determining correct overexposure: (For most lighting conditions, exposure compensaton is going to be +1/3 to +2/3 stops). We will be moving the mountain peaks of your histogram toward the right, approaching the far right end of the baseline, without going so far that any of them abruptly disappear.

  • Turn on automatic playback so that your image shows on the screen immediately after your shot is taken.
  • With exposure compensation set to zero, take a photo in your usual manner.
  • In playback mode, check the histogram for your image.
  • If the peaks on the right end of your histogram do not extend almost completely to the far right side of the baseline, then set exposure compensation up by +1/3 to +1/2 stop.
  • Repeat the same shot. Again check the histogram.
  • The peaks will extend somewhat more to the right (If they extend almost to the far right end of the baseline, then you are done with this stage). If there is still a lot of black space between your peaks and the far right baseline, set exposure compensation up another +1/3 to +1/2 stop.
  • Repeat the shot and check histogram again.  (Probably you are done now, but repeat if needed).
  • For most lighting conditions, in my experience, an exposure compensation adjustment of +2/3 stop is correct.
  • Here are two tips for remembering  this technique.  First, “The bright is on the right”. Second, “Moving (the histogram) to the right” is abbreviated Mttr, pronounced “Meter” as in light meter)
  • The above technique gives you correct exposure for that specific subject and lighting condition. Whenever lighting conditions change, check your histogram and, again, adjust exposure compensation with this technique.
  • A word of warning: Do not set it and forget it. Re-evaluate exposure for every new lighting condition.

Correction Stage 2: This is done with your editing software. Any editing program will work for this. It does not need to be elaborate (The program that came with your camera will work fine). Open the image that you just overexposed (If you like the way it looks, you can skip this stage).  If you image appears too bright, slide the exposure slider to the left to decrease exposure by the same amount that you increased it when taking your photo. (While you have your editing program open, you may wish to adjust white balance, contrast or any other parameter that improves the appearance your image)

Results: Now you have an image with correct exposure, but with more detail in the darker areas and shadows than it would have had.

Optimum exposure for color: A drawback of the above (luminance) overexposure technique is that fine gradations of color will be lost in the highlights, resulting in a blotchy appearance of the color in these areas.  For best detail in color highlights, an image usually needs to be underexposed a small amount. To determine the appropriate amount underexposure, use the color histogram, not the luminance histogram.  (If your camera does not offer a color histogram, I recommend “guesstimating” with exposure compensation of -1/3 in subdued lighting and of -2/3 in brightly lit conditions). Color histogram display during playback is usually set in the same way that the luminance histogram was set above (Set it in the playback menu and also with the display options button on the back of the camera).

  • Take a shot with exposure compensation zero. Check the color histogram.
  • Probably at least one color will extend all the way to the far right end of the baseline and abruptly cut off (No black area between the tips or all the colors and the far right baseline).  If that is what you see, decrease exposure compensation by 1/3 to 1/2 stop. (If the color channels approach, but do not abruptly disappear off the far right side of the baseline, then your exposure (for color) is correct already.
  • Repeat your same shot and again check the histogram.
  • If any color channel still abruptly cuts off at the far right, decease exposure compensation another 1/3 to 1/2 stop.
  • Probably you have good results by now, but repeat this procedure once more if needed.
  • Generally the correct amount of underexposure will be -1/2 to -2/3 stop.
  • Your color highlights will now be the best that your camera can offer.
  • However, whenever lighting conditions change, re-evaluate the histogram and adjust exposure compensation if needed.
  • A word of warning: Do not set it and forget it. Re-evaluate exposure for every new lighting condition.

I welcome comments, corrections and suggestions for future blog topics.

I am available at NaturePhotoRehab.com to assist clients with transforming their images into impressive works of art that they will be proud to either hang on their own wall or to give as a gift.

J. Michael Harroun(c)2012  NaturePhotoRehab.com

Photography: Wonderful Confusion

“How wonderful that we have met with a paradox. Now we have some hope of making progress.”  – Niels Bohr

I love  learning new facts about Nature. Obviously it is far to complex to be fully known or understood. In spite of this, I tend to drift into an illusion that all the important scientific facts are already known. Then, something new is discovered.  Recently five  new animal species were  found in  the rainforest of New Guinea. What? All these years of scientists and explorers poking around and researching, and they have not yet found all of the animal species here on earth.? Wow! That’s cool!

Several years ago two new species of  microorganisms were found near the top of a volcano in South America. Their respiration utilizes sulfur. That is unique. The respiration of all other plants and animals involves oxygen, carbon dioxide and water. No one knew that sulfur could be a basic component of respiration. Men have walked on the moon. Lots of facts are known  about black holes and  quarks. Yet we had not known all the types of respiration of earth organisms.  That’s cool!.

My personal  “find” yesterday was something new to me (No, not a new species).  It was a beautiful flower of which  I had never heard (Celosia).  I looked at it admiringly. Is this whole thing a flower? Or is much of it tiny modified leaves? A bracken? Hairs? Modified spines?  Or is it some type of fern?  Oh, wait! Those are the flowers, tiny and few. I still don’t understand what these brilliant spires are. But at least I know where its flowers are. How cool!

Some may ask what this has to do with photography. For me, photography is about becoming more aware. It is a matter of developing an “in the moment” awareness of, not only the things that I know and expect; but, even more importantly, an openness to the unknown and unexpected. What is even better, I get to touch it with my hand or study it with my eyes and photograph it with my heart. This is great! What a wonderful confusion!

I used to believe that I should know all the answers. Now I am content just to be alert and aware; just to know some of the questions.

I welcome comments and suggestions.

I am available at NaturePhotoRehab.com assisting clients to transform their photos into works of art that they are either proud to give as gifts or to hang on their own wall for inspiration.